Did you know that you can do Step Sequencing in Ableton Live without M4L, only with any MIDI keyboard or control surface? You just need to program a few macros and shortcuts, and you're ready to sequence! Without touching your computer or mouse :)
This quick tip applies to any Ableton Live version: 9, 10, 11+. Any MIDI controller will do, and if you're looking for a MIDI keyboard upgrade, check this article about the 7 Best MIDI Keyboard Controllers.
Macros preparation for step sequencing
There are a few macros to set up before beginning. You can use any keyboard or supported control surface to assign the following macros.
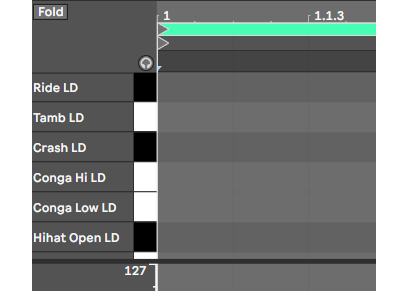
- First create an empty MIDI clip, with a double-click on an empty MIDI clip in Session view
- We have now an empty clip in the lower part of Ableton.
- Then click on the little gray headphones icon 🎧
To assign the needed macros for step sequencing:
Ctrl+MorCmd+Mto activate MIDI mapping mode- Click on the ⬅ icon and then touch a key/pad on your MIDI controller
- Click on the ➡ icon and then touch a key/pad on your MIDI controller. You can also choose a MIDI knob or slider :)
Ctrl+MorCmd+Magain to stop the assignment
Below you'll see that I have mapped the step backward and forward buttons to the B3 and C4 notes of my MIDI keyboard:
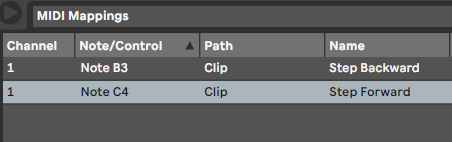
So now I can move one step forward and backward, on the clip timeline, on my MIDI keyboard, without touching my computer.
Start your step sequence in Live
The interesting thing is that you can use this technique while playing live. Just like if you had a hardware-based sequencer!
Imagine you're starting to play your favorite song in Session View.
-
The transport is running, and now you create an empty MIDI clip with a double-click on an empty MIDI clip.
-
Make sure that the little round button 'MIDI Editor Preview' is enabled (blue colored headphones) 🎧
-
Now while playing notes, or a chord, touch the MIDI key you have assigned before.
-
Your chord will be recorded just like you were in a step sequencer as you see below: 🕺
If you play the same notes and move the MIDI backward key the notes will be deleted.
So the full workflow is:
- play some notes
- and turn your assigned knob/key forward
- release the notes
- turn the knob/key again to insert silence
- repeat
With some exercise you'll be able to step sequence quickly and even during a live performance. The key is to find the MIDI keys or knobs that will work best for you, to move the next or previous step.
And now transpose the MIDI sequence with your keyboard
Now that you have your fresh MIDI clip, did you know that Ableton Live can transpose it automatically while playing?
You just need to assign the launch button of the clip to a notes range of your MIDI controller.
To do this:
Ctrl+MorCmd+Mto activate MIDI mapping mode- Click on the MIDI clip in session view
- First play the chosen root key on your MIDI keyboard, let's choose G1
- Do not release the key!
- Now play C1 and then C2 to select the notes range for Live transposition
Ctrl+MorCmd+Magain to stop the assignment

Now each time your play C1 to C2 on your MIDI keyboard, Live will play the MIDI sequence transposed 💥
Imagine now, you can assign the 7 octaves of your MIDI keyboard, to 7 Live clips and play them transposed? How powerful it is!
To sum up with Ableton Live, with any MIDI keyboard you can:
- step sequence, while performing live
- transpose the sequence, if you assign a clip to a notes range
Do you have more live sequencing tips? Feel free to comment below 👍
Speak your mind