Are you a music producer, beatmaker, or live performer ready to share your sonic masterpieces with the world in real time? If yes, this article is your golden ticket to broadcasting your Ableton Live sessions to an eager online audience! Today, we're going to dive into the magical world of live streaming, guiding you through a step-by-step process of setting up your Ableton Live set with Open Broadcaster Software (OBS) on Windows.
But let's be honest: the first time you try to marry Ableton with OBS Studio, it can feel like assembling furniture without instructions—frustrating, puzzling, and possibly ending with something looking upside-down. Not to worry, we're here to provide the missing manual, I've experimented with various configurations, and I've found that only the following one performs optimally on Windows, when using ASIO audio drivers.
If you're on macOS, the process is considerably simpler to loop audio outputs, with the free BlackHole driver. Comment below if you'd like detailed instructions.
So grab your headphones, fire up your computer, and let's get your live music out there for the virtual crowd to enjoy! Lights, camera, Ableton — let's roll! 🎹🔴
Install the right streaming plugin for Ableton / OBS Studio
You will need a free plugin called ReaStream.
- Download and install the Reaper plugins here
- Refresh your VSTs in Ableton Live
- Add the 'ReaStream' plugin to your Master bus
- Open the plugin and set the following parameters
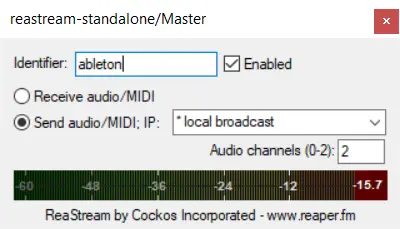
- Set the identifier, which can be "ableton"
- Send audio/MIDI: local broadcast
Upon initiating your live set, the audio should duly register on ReaStream's meters.
Receive Ableton audio in OBS Studio
Now that the Ableton audio streamer is set-up, it's time to configure Open Broadcaster Software session.
If you don't really understand sources and filters in OBS and need more information on how to stream video, there are many good tutorials like this one.
- Open OBS Studio and your Scene
- In your Sources, add a new Audio Input Capture, and select any source Device
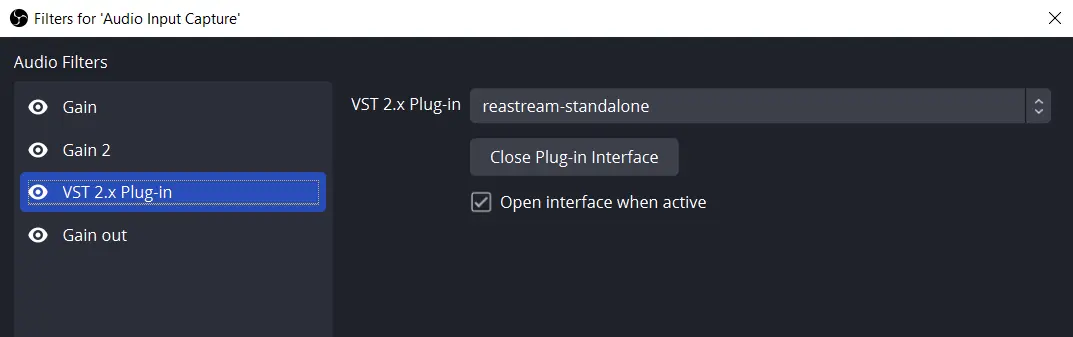
- Open the Filters for this source
- Add two (or more) "Gain" Filters set to -30db. The purpose is to mute the original source device, which might be your PCs microphone.
- Add the "VST 2.x Plug-in" filter and choose "reastream-standalone"
- Add a final "Gain" filter to adjust the output volume.
You should have the following chain, more or less:
Now in the Reastream OBS plug-in window, set the following parameters:
- Set the same identifier "ableton"
- Choose the option: Receive audio/MIDI
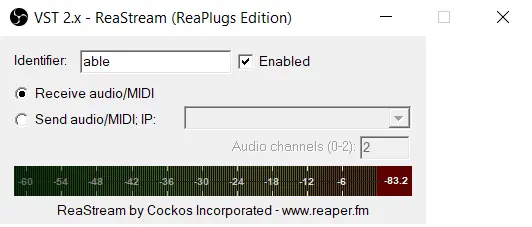
Initiate a playback in Ableton Live, and the OBS receiver meter should respond accordingly, ensuring audio streaming.
Boom! There you have it – a full guide to ship your live Ableton tunes via OBS, as clear as a DJ's beat drop. Just follow the steps, and you'll be playing the internet's main stage in no time! 👍🚀✨ Encounter hurdles? Give us a shout in the comments.
Speak your mind