Frustrated by missing audio effects in Ableton Live Lite 12? Many powerful devices, including Amp, advanced modulation tools, and creative effects are officially locked behind Standard and Suite. But here’s the surprising part: some of these effects are still accessible inside hidden Ableton Core Library racks.
In this guide, you’ll learn how to unlock and use hidden audio effects in Live Lite and Intro without paying for an expensive upgrade.
Here's a list of my favorite effects that are typically limited to the Suite or Standard versions of Ableton Live:
- Amp and Cabinets, 7 classic guitar amplifiers and 5 classic guitar cabinets (only Ableton Live Suite)
- Drum Buss, the all-in-one tool for drums, capable of adding warmth, distortion, drive, compression, transient shaping
- Dynamic Tube, a Tube saturation for added harmonics and warmth
- Glue Compressor, a great analog-modeled compressor based on the classic bus compressor (SSL)
- Vinyl Distortion effect
I'm going to show you in the following lines that some of these excellent plugins are actually available in Ableton Live Lite or Intro. Yes, you read that right! There is no need to switch to the Suite to enjoy their exceptional sound quality.
Please note that this article will be updated regularly as I discover new racks.
Quick Recap
Before going into the details later, I'll summarize here which racks to use, depending on the audio effect you're looking for.
| Effect You Want | Rack to Use |
|---|---|
| Distortions & Cabinets | "Basic X Guitar Amps" racks |
| Vinyl & Tube Distortion | "Master Worn Out Vinyl" rack |
| Glue Compressor (SSL) | "Master Full Chain" rack |
| Drum Buss | Channel Kick rack |
| Gate | Vocal Strip rack |
📁 How to Find These Racks
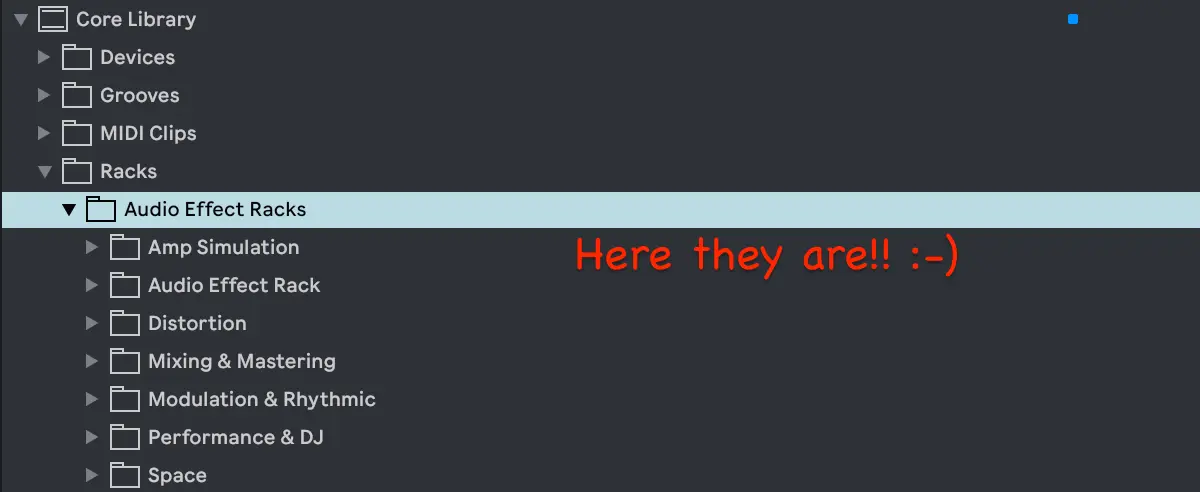
You can find all of these in the Ableton Browser under: Packs > Core Library > Racks > Audio Effect Racks From there, look into the Amp Simulation or Mixing & Mastering folders.
How to get Amp in Ableton Lite
Ableton’s Amp, Cabinet, and Pedal audio effects are designed to emulate the tones of classic guitar amps, cabinets, and pedals. Here’s what you can do with them:
- Simulate Guitar and Bass Amp/Cabinet Combos: Use Amp and Cabinet together to recreate the sound of iconic guitar and bass amp/cabinet combinations. Experiment with different amp types, speaker cabinets, and mic placements to achieve unique tones.
- Enhance and Shape Sounds: Apply Amp and Cabinet to drums, synthesizers, loops, and vocals to add warmth, drive, and character. The possibilities are endless, and it’s encouraged to try them on various sources.
- Create Interesting Results: Feed Amp and Cabinet with seemingly unrelated sound sources, such as percussion or noise, to discover new and unexpected textures.
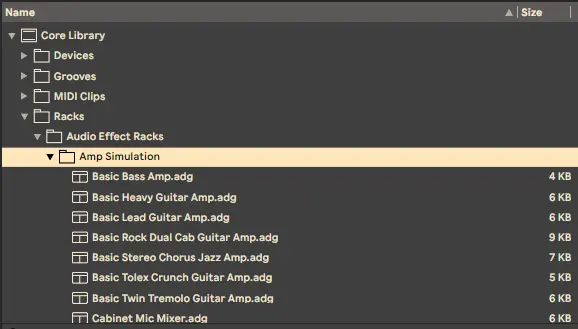
If you look in the Core Library, you'll find most of Live Suite's amp simulations in the Racks -> Audio Effects Racks -> Amp Simulation section:
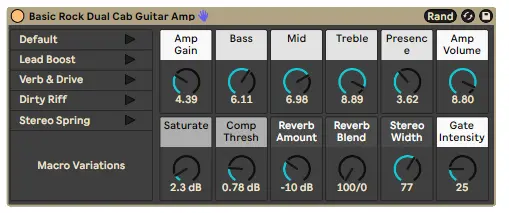
The thing is, you won't have access to all the parameters with Live Lite, but you will have the main ones. For example on Live Lite and Intro, here is your view of the Basic Rock Dual Cab Guitar Amp:
And for Ableton Live Suite:

So I'm going to describe what's inside the most interesting effect racks, which you can't see if you don't have the Suite version of Ableton Live. Even with Ableton Standard, you don't have full access to the great Amp simulations made by Softube...
Classic Guitar Amps
-
Basic Rock Dual Cab Guitar Amp, an effect chain with:
- A Gate with intensity controlled by the Gate intensity macro
- A Soft sine Saturator which gain is set with the Saturation macro
- An Amp in Rock mode, with Amp Gain, EQ and Presence which can be set with the macros
- A Cabinet with two mics which can be adjusted with the Stereo width macro
- A 3:1 ratio Compressor. The Comp Thresh adjusts the threshold.
- A nice Spring Hybrid Reverb.
-
Basic Twin Tremolo Guitar Amp:
- A Guitar Gate
- A Pedal in Distort mode with 2 macros for gain and EQ
- A Boost Amp with Gain, EQ and Presence macros
- An Auto Pan effect for the tremolo
- A nice Spring Hybrid Reverb.
- A 2x12 Cabinet
- A Limiter
Bass Amp
- Basic Bass Amp:
- A Guitar Gate
- An Amp in Bass mode
- A 4x10 Bass cabinet with adjustable mic type and position
Saturated Amps
-
Basic Heavy Guitar Amp:
- A Guitar Gate
- An Amp in Heavy mode
- A 4x12 cabinet and 1x12 with adjustable blend
-
Basic Lead Guitar Amp: similar to the previous one but the Amp in Lead mode.
-
Basic Stereo Chorus Jazz Amp, a more complex chain with:
- A Guitar Gate
- A 1:1.33 Compressor, not adjustable
- A Pedal in Overdrive mode with two macros for gain and EQ
- An Amp in Clean mode with Gain and EQ macros
- A Chorus-Ensemble with two macros
- A nice Dark Hall Hybrid Reverb
- A 2x12 cabinet
- A Limiter
-
Basic Tolex Crunch Guitar Amp:
- A Guitar Gate
- A Pedal in Fuzz mode with 3 macros for gain and EQ
- An Amp in Crunch mode
- A 4x12 cabinet
Cabinet & Mic Tools
- Cabinet Mic Mixer:
- A cabinet with 3 adjustable mics. With the Cabinet Type macro you can try all Ableton Cabinet types: 1x12, 2x12, 4x12, 4x10, 4x10 bass
- A Room hybrid reverb
Clean & Creative Amps
-
Clean Guitar Amp:
- A Drum buss to add distortion and color (with Input Gain, Trnsnt, High Freq, and Comp macro knobs)
- A Cabinet with 4 speakers configurations which can be changed with the Speaker Blend macro.
- An EQ with a -8 dB notch
- A Limiter and a Reverb
-
Dreamy Amp Space, a great option for synth sounds:
- A Blues Amp with Gain, EQ macros
- A Chorus
- A Delay set to 3/16
- An Hybrid Reverb with Studio and Shimmer mode
- A Glue Compressor to add sustain
💡 Dreamy shimmer reverb: Set the 1st four knobs to 3/5/5/5, other ones to zero, except for the Reverb one.
I think that by combining one or more of the above racks, you'll have access to a very wide palette of sounds simply with Live Lite. And you won't need to use external plugins such as AmpliTube, Guitar Rig or Bias FX.
Mixing and Mastering effects hidden in Live Lite
You'll find the racks below under the Racks -> Audio Effects Racks -> Mixing and Mastering section in the Ableton Browser. If you want to taste the excellent Glue Compressor this is the place. These racks have good effects on the Master Track and also on individual instrument tracks.
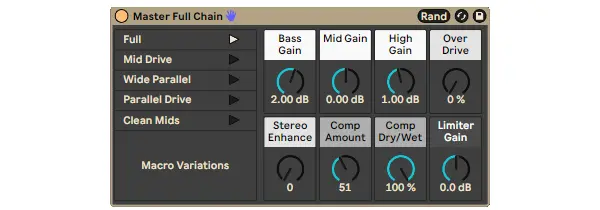
- Master Full Chain:
- An EQ8 device to adjust the bass gain around 70Hz (Bass Gain Knob), a Mid gain for 1Khz, and a High Gain around 8 kHz.
- A 2:1 Glue Compressor with a slow attack and fast release. The Comp Amount macro sets the threshold and make up gain
- An Overdrive controlled by the Overdrive knob. The dry/wet setting is 20% here
- A Utility device that will change the stereo width with a Stereo enhance macro.
- A Limiter linked to the Limiter Gain knob
💡 Isolate the Glue Compressor: Set the EQ gains, overdrive, stereo, and limiter to zero, and you will hear only the Glue Compressor — adjust with Comp Amount and Comp dry/wet.
-
Master Dance Aggressive rack is made of:
- An EQ8 device to adjust the bass gain around 55Hz (Bass Gain Knob), a Mid gain with the 2 following knobs, and a High Gain around 10 kHz.
- A modern 4:1 Compressor with a 10 ms attack, adjustable Threshold, Gain, and Dry/Wet with the 3 macro knobs.
- A Soft sine Saturator. If you raise the compressor gain, then you'll begin to saturate this saturator.
- And a limiter with a gain macro.
-
Master EQ and Glue:
- An EQ8 device to adjust the bass gain around 70Hz (Bass Gain Knob), a Mid gain with the 2 following knobs, and a High Gain around 13.7 kHz.
- A Cytomic Glue Compressor. The ratio is 4:1 here, a fast attack of 0.3 ms, with alterable Threshold and Makeup Gain via macro knobs of the corresponding name. The soft clip is enabled and will limit the output to -0.5 dB. Some producers prefer this option to a limiter, to add nice harmonics.
-
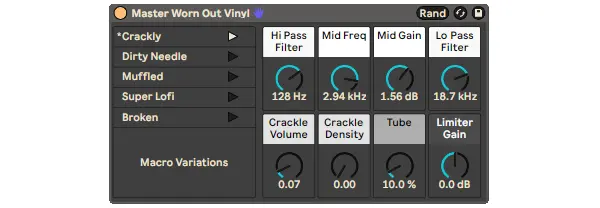
Master Worn Out Vinyl, great to play with Vinyl and Tube Distortion:
- An EQ8 device to add a Low Cut, a Mid Gain with the 2 following knobs, and a High Cut.
- A Vinyl distortion module. You can add crackles with the two Crackle knobs.
- A Dynamic Tube distortion module to add more harmonics. This one has a 12 dB gain and you can change the Dry/Wet levels with the Tube macro
- A Limiter
💡 Isolate Vinyl Distortion: Set all macros to zero and you'll hear only the Vinyl Distortion. Lots of Electronic music producers use this device on synths to add more harmonics. Group this rack into another one to add your own dry/wet level.
- Master Patience, new in Live 12, including the Roar plugin:
- A Glue Compressor with a high 1:10 ratio, with two knobs for Threshold and Makeup
- An Eq8 to boost/limit frequencies over 5 kHz with the EQ scale knob
- The Roar saturation plugin, which adds Soft saturation to 3 parallel bands, controlled by the Roar dry/wet knob
As for the effect racks more specific to percussion processing, you have:
-
Channel Kick. With this one you can access nearly all parameters of the Drum Buss:
- The 1st one is a Drum Buss in soft drive mode. The following macros are wired to the Drum Buss: Drive, Release, Sub and Sub Frequency
- An EQ8. Low gain controls the gain at 45Hz, Mid Cut at 500Hz, Attack at 11kHz (it is a bug?)
- A Multiband compressor, which will compress mids and highs when you turn the Comp knob.
- And a final Limiter.
-
Drums Overdriven, a simple chain with an Overdrive device:
- An EQ8 device to adjust the bass gain around 70Hz (Bass Gain Knob), and a High Gain around 8 kHz.
- An Overdrive controlled by the Overdrive Drive and Tone knobs. The dry/wet setting is 40%
- A 2:1 Glue Compressor with adjustable attack and fast release. The Comp Thresh macro sets the threshold. The Comp Attack, the attack in ms. Comp dry/wet and Comp gain, adjust the dry/wet amount and the makeup gain.
And for the generic processing of audio tracks, these effects should be placed at the end of your tracks to define what needs to be in front or back in your mix:
- Channel Strip Analog Tape, to add coloration to the track:
- With first on the rack, an EQ with two controls: Low gain below 320Hz and High gain above 2700Hz.
- A Saturator with an Analog clip curve and 3 buttons: Drive amount, Color (boost below 300Hz) and Amount (dry/wet knob).
- A smooth Compressor with a long attack and release (45ms/170ms) which tries to mimick an opto-compressor.
* Channel Strip Basic. * With an EQ with controls for 3 bands: Hi-Pass filter, Low-Pass filter, and a paramteric EQ for Mids * A Gate and its threshold button. The attack is fast and the release quite long with 100ms. * A Compressor with a 5ms attack, and a slow 450ms release. On the Threshold and Ratio can be changed with the 2 buttons. And now a few Voice related Effect Racks:
- Vocal Strip, the 1st effect you should use in your track for filtering conversations:
- You get a Noise Gate effect which is controlled by the Gate Thres knob. The time parameters for this gate are a 39ms attack, 52ms hold and 24ms release.
- Then a slow compressor with adjustable Ratio and Threshold
- An EQ8 device, where you can set an Hi Pass Filter, a Low Pass Filter and a Mid Gain boost which works at 1kHz.
- A final Compressor will be used as a De-esser for frequencies around 6 kHz.
💡 Need the missing Gate effect? Use the Vocal Strip — set all knobs to zero, Comp Ratio to 1:1, and play with the Gate Thresh knob! The Channel Strip Basic can also be used if the slow release time is ok.
- Voice Enhancer has a good De-Esser based on a multiband compressor. It's usually best to use this kind of de-esser instead of the one available in the Vocal Strip effect.
- The rack start with a De-essing Multiband Compressor working in the 3-11 kHz range. The intensity is controlled by the De-Ess knob
- Then you have two Compressors controlled by the Comp Amount knob. One to limit the output and the other to level the sound
- Another Multiband Compressor to improve speech intelligibility with the Enhance knob
- An EQ8 with a Hi Pass Filter to limit 'Pops' and the Add Air knob to boost frequencies around 250 Hz and over 8 Khz.
Delays, Space, Hybrid reverbs and crazy effects
- Stun Echo, lets you play with a Ring Modulator. This effect chain has
- A fixed Chorus
- Then a Pitch Shifter in Ring Modulation mode. The modulation frequency is set by the Ring Mod knob,
- An Echo device with two macros to control it, plus a Wobble amount. Unfortunately you cannot disable this echo.
- A Saturator controlled by the Fullness macro.
- A Reverb controlled by the Space macro.
- And a -2dB Limiter
Essential free plugins
I think with all the effect racks mentioned above, there's definitely a way to get some great-sounding results using Ableton Live Lite. But if you're looking for more control over two essential effects—EQ and compression—here are my free plugin recommendations:
- For EQ, I recommend TDR Nova. It’s a solid replacement for Ableton’s EQ8, offering dynamic EQ capabilities. It's dynamic so you can use it also as a compressor or a gate!
- For compression, check out Melda's MCompressor. It features an adjustable compression shape, and a range of up-sampling options.
As for everything else, if minimalist interfaces don’t scare you, give the Airwindows plugin pack a spin! It’s a treasure trove of sonic goodies—just don’t expect fancy GUIs.
Conclusion
The limitations of Ableton Live Lite don't have to be a roadblock. By leveraging the hidden power of the Core Library, you can access professional-grade tools like the Glue Compressor, Drum Buss, and authentic Amp simulations without spending a dime on upgrades.
Your next step: Pick one rack from the Quick Recap table above—like the Master Full Chain for your master track—and load it into your current project. You'll hear immediately how much more "polished" your Lite version can sound.
Happy producing, and if you've found another hidden gem in the Core Library, share it in the comments below!
Speak your mind