Pushing a mix to competitive loudness is straightforward. Keeping it clean and dynamic at those levels — that's where most producers hit a wall. If you've ever cranked a limiter only to hear your mix fall apart into pumping, distortion, and squashed transients, there's a better way.
This is the workflow I use every day to reach professional loudness using only Ableton Live's built-in tools. No magic wand required — just a limiter that's had its morning coffee.
In short:
- Pick a LUFS Goal: Define a loudness target based on your genre, and measure your starting point with a meter like the free Youlean Loudness Meter before any processing.
- Shave Peaks Per Track: Use Saturator as a transparent clipper and compressors to narrow the gap between peak and RMS on individual tracks, long before you touch the master limiter.
- Tame Low-End and Sidechain Thoughtfully: Keep sub bass to one source at a time. Roll off unneeded lows, mono the bass range.
A limiter clamps down whenever signal passes a ceiling. When it's forced to shave 10+ dB on every hit, the audible artifacts like pumping, breathing, flatness are unavoidable. The entire workflow here is built on one principle: handle the problems at the source so the limiter stays chill.
Pick a LUFS Goal
Before any processing, figure out where you're headed. Drop a loudness meter on the master bus. Youlean Loudness Meter 2 costs nothing and delivers detailed readouts, or if you prefer, a free Max4Live device like Loudness Meter by Funkatronics.

Play your unprocessed mix and check the short-term LUFS. Electronic genres typically land between -3 and -10 LUFS, though this shifts depending on style and arrangement, a verse sits a few LUFS lower than a chorus. Choose a target that makes sense for the section in front of you.
Tip: Research typical LUFS values for the style of music you produce. It won't be identical for every track, but it anchors your expectations.
Let the Limiter Expose the Trouble
Drop Ableton's Limiter on the master and raise input gain until the meter hits your LUFS goal. It'll sound wonky, that's intentional. All that pumping and flattening are symptoms, and the limiter is your investigation tool.
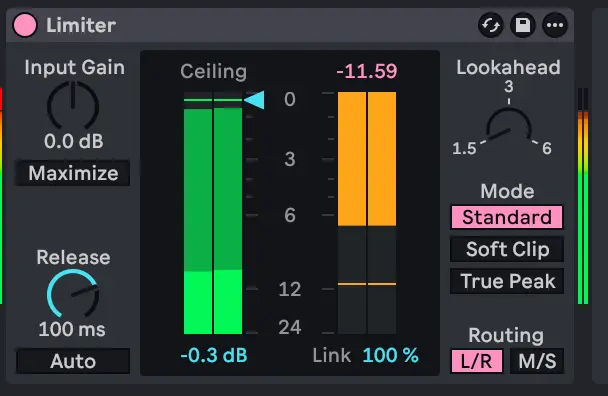
Mute every track except one and observe the gain reduction meter. Whichever soloed track sends the meter swinging the hardest is the one overworking the limiter. Those are the tracks that need attention first.
Reach for Sidechain After, Not Before
It's tempting to throw sidechain compression at every low-end problem right away. Resist that. Sort out crest factor and frequency clashes first, then deploy sidechaining for whatever overlaps remain — most often the kick and sub bass hitting at the same time.
Shave Peaks with Saturator
The biggest obstacle to loudness is crest factor: the distance between a signal's peak and its average (RMS) level.
Percussive sounds like drums generate sharp transient spikes that tower far above what our ears actually register. The limiter must react to those peaks regardless, but we perceive loudness closer to the RMS level. Trimming peaks without an audible change buys headroom across the entire mix.
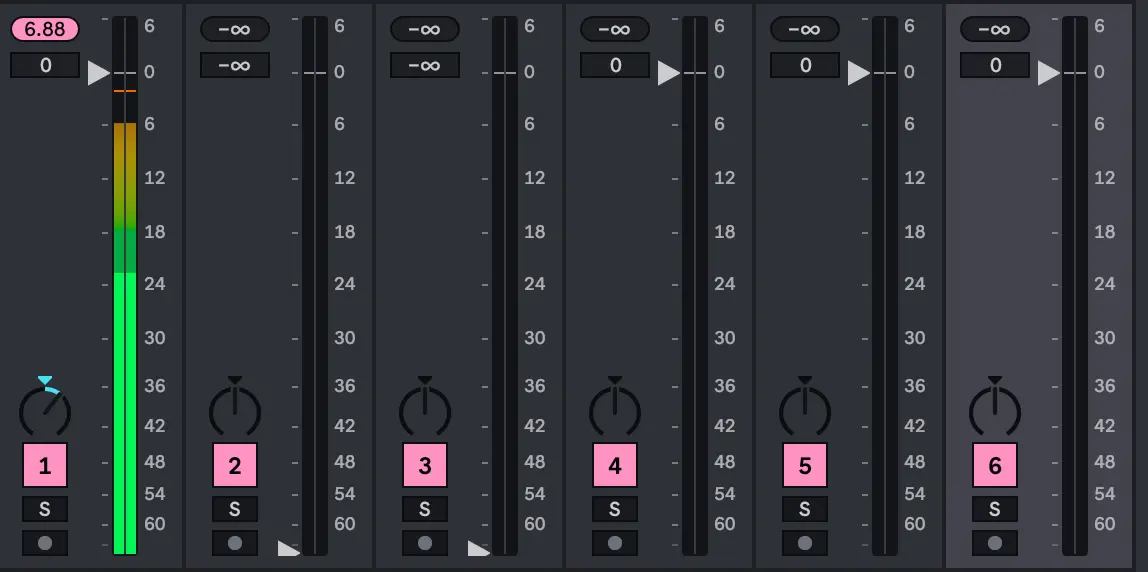
Above you can see a track with a high crest factor: almost 24dB difference between peaks and RMS level.
Ableton's Saturator doubles as an excellent clipper when set up properly:
- Load Saturator on a track (start with something transient-heavy like a snare)
- Disable High Quality via the title-bar right-click menu. With oversampling active, Saturator rounds off less aggressively, making it a weaker clipper in this role
- Pick Digital Clip or Analog Clip as the mode — both work; audition each to see which suits the material
- Raise Drive and lower Output by matching amounts (roughly 10 dB is a good starting point)
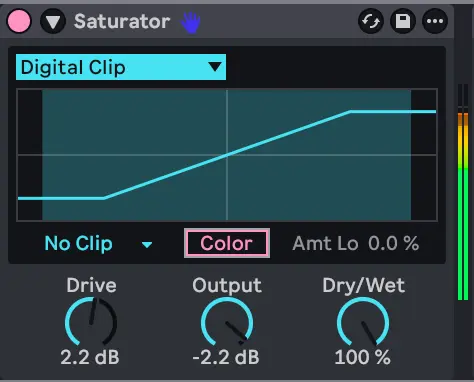
What happens: RMS holds steady while peaks come down substantially. Listen carefully with the device on and off, the change should be virtually imperceptible. The peaks are being sliced so rapidly that any added harmonics fly by unnoticed.
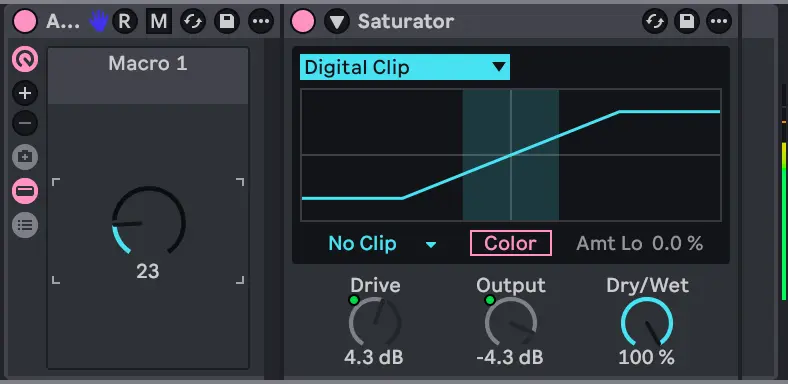
Tip: For speed, group Saturator and assign both Drive and Output to a single macro. Set Drive's minimum to 0, then flip the min/max values for Output. Turning the knob now raises input gain while pulling output down by an identical amount. A one-knob clipper you can save as a preset.
Crank the amount until the sound starts losing its original character or feeling compressed, then ease off. A snare can often handle 10–12 dB of gain reduction. A kick is more sensitive. Around 5 dB might be the ceiling before the longer body reveals artifacts. That limitation leads to the next technique.
Shorten Transients Before You Clip
Clipping is most transparent on quick bursts. When a sound sustains, like the body of a kick , the clipped waveform lasts long enough for the distortion to become noticeable. The fix: trim the transient's length upstream of the clipper with a compressor.
- Place a Glue Compressor before the clipper on the same track (or a classic compressor if you don't own Live Suite )
- Set Attack near 10 ms, enough for the initial snap to pass through while the compressor grabs the sustained portion
- Choose a fast Release (less than one ms) so it releases quickly between hits
- Drop the threshold until the tail of each transient pulls back, 5-10 dB reduction is ok
- Apply makeup gain to match the bypassed volume

With shorter, tighter transients feeding the clipper, you can safely apply more aggressive clipping moving from 5 dB to 7 dB on a kick, for instance, without any audible penalty.
Clear Low-End Clashes
When two or more elements generate sub-bass energy simultaneously, low-end buildup forces the limiter to clamp down constantly. A straightforward guideline: only one element should carry sub content at any moment.
Find the clashes by soloing pairs of tracks and checking the limiter. Spikes in gain reduction point directly to conflicts.
On tracks that shouldn't own the sub range:
- Add an EQ with a Low Cut to strip away unnecessary bottom end
- For wide bass material, drop in Utility and narrow the Width
- Switch on Bass Mono inside Utility and slide the crossover up to roughly 200–250 Hz, collapsing the low end to mono puts less stress on the limiter
- Now the following Clipper will work better

On any track harboring hidden low-end - percussion, leads, FX - sweep an EQ across the low range. Synths and processed sounds frequently generate bottom-end energy that goes unnoticed. Rolling off that excess frees a surprising amount of limiter headroom.
Tip: Bundle the EQ and clipper into a group and bind a key (Q, for instance) to toggle the chain. Flip the processing on and off while monitoring the limiter's gain reduction, fewer spikes translate directly to less pumping and a cleaner result.
You can now enabled the side-chaining that you disabled at the start of this cleanup process.
And if you are also cleaning up vocals in the same session, De-essing for free with Ableton Live covers another stock-plugin workflow.
Master Bus Processing
With the track-level cleanup done, the same concepts apply on the master channel:
1. Tame transients with a Glue Compressor
Add a Glue Compressor to the master. Dial in a moderate attack, 10ms, (allowing transients through) paired with a fast release. Ease the threshold down gently — go lighter than you did on individual tracks, since the compressor now acts on the entire mix. A 2-3 dB target reduction is best. Compensate with makeup gain so loudness stays consistent.
By shortening the sharpest peaks, the compressor ensures the limiter never has to clamp down on them. The LUFS number may read the same, but the mix is functionally louder because the limiter's gain reduction is smaller and briefer.
2. Insert a clipper between compressor and limiter
Place your clipper (Saturator — Digital Clip or Analog Clip, HQ off) after the compressor and before the limiter. Raise the drive gradually. Compare Digital Clip and Analog Clip. In many cases Analog Clip yields a smoother result on the full mix, but trust your ears over any rule.

Tip: A glue compressor clips already the signal to -0.5 dB, in Soft Clip mode, so this clipper can be removed and you might prefer the clipping produced by this compressor.
The aim: hold the limiter's gain reduction to roughly 3 dB maximum. Hit that, and the limiter stays transparent.
3. Fine-tune levels
After all the processing, some elements may still sit a touch too hot. Dropping the kick by 1 dB or nudging other balances slightly can make a noticeable difference when you're close to your target.
Conclusion
The entire approach boils down to one idea: fix the sources so the limiter stays out of the way. Define a target, let the limiter reveal trouble spots, clip and compress on a per-track basis, resolve low-end overlaps, add sidechain only where needed, then polish lightly on the master.
Want to go louder? The same toolkit scales. Clip more aggressively, push the limiter further, layer in subtle noise to fill perceived volume. Dynamic mixes can reach -4 or even -3 LUFS with these techniques. But ultimately, the quality of your track matters far more than its volume. A clean, musical, enjoyable listen always wins over sheer loudness. Loudness is just one dimension of a great-sounding record.
⭐ If you’d like to dive deeper into electronic music production with me, start with this free quizz.
Speak your mind